github.com
2026-09-08 - Precise fault recovery, Loader chainload fix, reproducible builds
Guarded assembly rewritten: MSR and MMIO fault recovery no longer guesses instruction length or repurposes CR2 as a signalling channel. Every protected access now carries a named label, and the exception stub compares the faulting RIP against those labels before resuming at the matching error path. Only
#UD,#GPand#PFare hooked; every other exception is forwarded to the original firmware handler with the exception frame, registers and CR2 untouched. The 256 generated ISR stubs are gone, which accounts for most of the reduction in binary size. MMIO stubs: all four zero-extend the 32-bit address before dereferencing it, stay off RSI and RDI (non-volatile under the Microsoft x64 ABI), return a defined status when they reject an unaligned address, and report a caught fault instead of reporting success. Power limits:MSR_RAPL_POWER_UNITdecoding corrected. Energy units were shifted by 16 instead of 8, and the power unit divisor was computed by shifting with the full 64-bit MSR value, so package, PP0 and PSys limits in watts were scaled wrongly on every SKU. Topology: package detection boundsCore[]and the per-thread pointer arrays, and stops rather than overwriting an already filled package when it runs out of slots. Loader: a boot entry naming the partition with no file path is now recognised as a self reference when Loader itself was started as\EFI\Boot\BOOTX64.EFI, which stops it from chainloading itself. If noBootOrderentry starts, it looks for\EFI\Microsoft\Boot\bootmgfw.efion every other EFI System Partition, and it returnsEFI_SUCCESSinstead of an error status, so the firmware no longer shows a boot failure dialog before continuing (issue #2). Build:/experimental:deterministicand/Breproon both projects. Two consecutive rebuilds of the same sources produce byte-identicalUnderVolter.efiandLoader.efi, so a published binary can be reproduced and compared against the release. Hyper-V: documented explicitly. UnderVolter finishes before VTL1 isolation is established, so hypervisor MSR filtering does not apply to it and the applied offsets persist into a Windows session with virtualization enabled (issue #1).2026-05-11 — Lunar Lake support, two-pass CPU detection, BootNext defensive, engineering polish
CPU support: Lunar Lake (Core Ultra 200V, CPUID
6,189,*) — 2-tile Lion Cove P + Skymont E architecture, on-package LPDDR5X, DLVR voltage regulation. Profilevcfg_q_lunarlake_clientincluded with conservative defaults. VR topology discovery disabled until community reverse-engineering matures; voltage offsets via MSR 0x150 attempted but may be silently dropped by firmware on locked SKUs. Raptor Lake Refresh (14th Gen Desktop6,191,*and HX Mobile6,186,4) now listed explicitly. CPU detection: two-pass match inDetectCpu()— exact{family, model, stepping}first, then{family, model}fallback with visible warning for unknown steppings of known models. Future microcode revisions of supported architectures detect automatically instead of falling through to the "Unknown CPU" path. Output now shows family/model/stepping in both decimal and hex for cross-referencing with Intel documentation. Boot-time robustness:BootNext = BootCurrentis written before everyResetSystemwarm reset (NVRAM patch + SelfEnroll). Defensive against firmware BDS quirks — some Lenovo Legion-class units treat warm reset as a "boot failed" event and skip to the next BootOrder entry, which would break the bootstrap chain. Boot sequence reordered: NVRAM patch → SelfEnroll → CPU detect, so reboot-triggering stages run before CPU/timing work. INI parser: new sharedIniHelpersmodule — single source of truth for streaming-scan helpers used by[SetupVar]and[SecureBoot]sections. Whitespace-tolerant section headers ([ SetupVar ],[SetupVar ]all match).Patch_Noffset width widened to 24-bit (cap0xFFFFFF) to support Dell Precision-class BIOSes withSetupvariables up to ~96 KB. Code cleanliness: standard EDK2 includes (UefiBootServicesTableLib,BaseMemoryLib) replace ad-hoc externs across 7 files; runtime flags consolidated inConfig.h.2026-04-15 — Secure Boot SelfEnroll with embedded root CA (
[SecureBoot])UnderVolter now ships with a complete Secure Boot self-enrollment workflow. A 4096-bit RSA root CA and Authenticode signing certificate are generated once on the developer machine;
build.ps1embeds the root CA into the EFI binary and signs it with the leaf cert. At runtime,SelfEnroll = 1writes the root CA into UEFIdb,KEK, andPKdirectly from the UEFI Shell — no external tools, no Linux environment, no MOK manager required. After a single enrollment reboot, every futureUnderVolter.efibuilt with the same signing certificate is trusted by the firmware automatically. The flow is idempotent: if the certificate is already indb, no write and no reboot occur. Supports both standardSetupModeand Dell/OEM Audit Mode / Custom Mode. Includes optionalTryDeployedMode(UEFI 2.5+ Audit→Deployed transition) andBootToFirmwareUI(boot directly into BIOS Setup after enrollment).2026-03-28 — Built-in NVRAM BIOS variable patching (
[SetupVar])UnderVolter can now patch hidden BIOS variables (CFG Lock, OC Lock, and any other
SetupEFI variable offset) directly fromUnderVolter.ini— no GRUB, no EFI Shell, no external tools required. Add a[SetupVar]section, setNvramPatchEnabled = 1, and UnderVolter reads the UEFISetupvariable, patches the specified byte offsets, verifies the write by reading back (fail-closed — reboot is only issued when the write is confirmed), and performs an optional warm reset. On the next boot the locks are cleared and voltage programming proceeds normally. The comparison is done on every run: if all offsets already hold the desired values, no write and no reboot occur — preventing infinite restart loops even whenNvramPatchEnabledis left permanently at1.2026-03-26 — Initial Release
UnderVolter is now available as a native UEFI application for Intel Core processors spanning 2nd through 15th generation (Sandy Bridge to Arrow Lake / Core Ultra). Supports voltage offset programming, power limit configuration, turbo ratio adjustments, and V/F curve overrides. Runs directly from UEFI firmware — no operating system required. Configuration via
UnderVolter.iniwith per-architecture profiles and safe default values.
UnderVolter — Native UEFI Undervolting Utility
📚 Table of Contents
- Overview
- Architecture
- Supported Processors
- Voltage Domains
- Power Limits
- Safety Features
- Configuration File
- NVRAM Setup Variable Patching
- BIOS Unlocking
- Secure Boot & SelfEnroll
- Deployment Methods
- OpenCore Integration
- EFI Boot Method
- Windows Boot Manager
- Build System
- QEMU Testing
- Source Code Structure
- Troubleshooting
Overview
UnderVolter is a native UEFI application that programs Intel CPU power management parameters directly from firmware, before any operating system loads. This approach provides several advantages over OS-based tools:
| Advantage | Description |
|---|---|
| No OS Dependencies | Runs on bare metal — no kernel drivers, no kernel extensions, no ring-0 components |
| Universal Compatibility | Works with Windows, Linux, macOS (Hackintosh), or headless server configurations |
| Persistent Settings | Applied at every boot — no need for startup scripts or scheduled tasks |
| Full MSR Access | Unrestricted access to Model-Specific Registers without kernel interference |
| Safe Defaults | Conservative voltage offsets with 20% safety margin based on community data |
| Emergency Exit | 2-second ESC key window to skip programming if system becomes unstable |
What Can UnderVolter Do?
- Voltage Offset Programming — Reduce CPU voltage per domain (P-Cores, E-Cores, Ring, Uncore, GT)
- Power Limit Configuration — Set PL1 (long-term), PL2 (short-term), PL3, PL4, and PP0 limits
- Turbo Ratio Control — Force maximum turbo ratios for P-Cores and E-Cores
- V/F Curve Overrides — Program custom voltage/frequency points per domain
- ICC Max Configuration — Set maximum current limits per voltage domain
- cTDP Control — Configure Configurable TDP levels and locking mechanisms
- Multi-Package Support — Handles multi-socket systems with per-package configuration
What UnderVolter Does NOT Do
- ❌ No dynamic adjustment — Settings applied once at boot (use ThrottleStop/Intel XTU for runtime tuning)
- ❌ No AMD support — Targets Intel Core processors only (AMD requires different MSR interfaces)
- ❌ No GUI interface — Text-based console UI with keyboard input (ESC to abort, F10 to override warnings)
- ❌ No automatic tuning — Does not test stability or find optimal values (user must configure via INI file)
Architecture
Execution Flow
Reboot-triggering stages (NVRAM patch, SelfEnroll) run before CPU detection, TSC calibration, and the startup animation. On a bootstrap reboot, no downstream work is wasted before the warm reset. Both stages are idempotent — subsequent passes are fast no-ops when state already matches the desired post-conditions.
- Entry Point — UEFI firmware BDS loads
UnderVolter.efias aUefiApplication - Configuration Load — Parses
UnderVolter.inifrom same directory or known fallback paths; initialises GOP console - NVRAM Patch — If
[SetupVar] NvramPatchEnabled = 1: patches BIOSSetupbyte offsets, verifies write by reading back (fail-closed — reboot only issued when write confirmed). If all offsets already hold target values → no write, no reboot. Before reboot, writesBootNext = BootCurrentto pin the next firmware boot to the same entry — defensive against firmware BDS quirks (some Lenovo Legion units treat warm reset as "boot failed" and skip to the next BootOrder entry) - SelfEnroll — If
[SecureBoot] SelfEnroll = 1: checks whether root CA cert is already in UEFIdb; if not, writes cert todb,KEK,PK, attempts Audit→Deployed Mode transition. Reboot only afterdbandKEKwrites are confirmed. SameBootNextpinning as NVRAM stage. If cert already indb→ no-op - CPU Detection — Reads CPUID, two-pass match against
gCpuConfigTable: exact{family, model, stepping}first, then{family, model}fallback with warning for unknown steppings of known models - Profile Selection — Matches detected CPU to INI profile (e.g.,
Profile.CoffeeLake) - MP Initialization — Locates all logical processors via
EFI_MP_SERVICES_PROTOCOL - Package Discovery — Enumerates physical packages and cores per package
- VR Topology Probe — Discovers voltage regulator addresses and types via OC Mailbox (where supported)
- Emergency Exit Window — 2-second ESC keypress window; ESC aborts before any MSR writes
- Voltage Programming — Applies offset voltages per domain via FIVR interface
- Power Limit Programming — Configures PL1/PL2/PL3/PL4/PP0 via MSR and MMIO
- Lock Application — Locks configuration registers to prevent OS modification
- Status Display — Shows applied settings table
- Return —
return EFI_SUCCESSexits theUefiApplication; firmware BDS proceeds down the BootOrder list to the next entry (typically Windows Boot Manager)
Memory Model
UnderVolter operates entirely within UEFI runtime services memory:
| Component | Size | Lifetime |
|---|---|---|
.text code section |
49 KB | Loaded by firmware |
.data (CPU tables, console font, embedded root CA) |
64 KB | Loaded by firmware |
.pdata + .xdata unwind data |
3 KB | Loaded by firmware |
| INI Parser | ~8 KB | Stack-allocated |
| MP Dispatcher | ~5 KB | Heap-allocated |
| Console Buffer | ~16 KB | Framebuffer-backed |
Loaded image: ~119 KB (UnderVolter.efi is 121,696 bytes on disk; .rdata is merged into .data at link time). Runtime allocations on top of that stay under 30 KB.
Supported Processors
UnderVolter includes pre-configured profiles for the following Intel microarchitectures:
| Architecture | Generation | CPUID | Example Models | Safe Offset (P-Core) |
|---|---|---|---|---|
| Arrow Lake | Core Ultra 200S/HX (15th) | 6,197,* / 6,198,* |
Core Ultra 9 285K | -30 mV (conservative) |
| Lunar Lake | Core Ultra 200V (2nd-gen Core Ultra mobile) | 6,189,* |
Core Ultra 7 268V | -30 mV (experimental — OC Mailbox restricted) |
| Meteor Lake | Core Ultra 1xx H/U (1st-gen Core Ultra mobile) | 6,170,* |
Core Ultra 7 155H | -30 mV (conservative) |
| Raptor Lake Refresh | 14th Gen Desktop / HX Mobile | 6,191,* / 6,186,4 |
i9-14900K, i9-14900HX | -80 mV |
| Raptor Lake | 13th Gen | 6,183,* / 6,186,2-3 |
i9-13900K, i7-13700K | -80 mV |
| Alder Lake | 12th Gen | 6,151,* / 6,154,* |
i9-12900K, i5-12600K | -80 mV |
| Rocket Lake | 11th Gen Desktop | 6,167,* |
i9-11900K, i7-11700K | -80 mV |
| Tiger Lake | 11th Gen Mobile | 6,140,* / 6,141,* |
i7-1185G7, i7-11800H | -80 mV |
| Comet Lake | 10th Gen | 6,165,* / 6,166,* |
i9-10900K, i7-10700K | -40 mV (conservative) |
| Coffee Lake | 8th/9th Gen | 6,158,* / 6,159,* |
i9-9900K, i7-9750H | -180 mV (user tested) |
| Kaby Lake | 7th Gen | 6,142,* / 6,158,* |
i7-7700K, i5-7600K | -80 mV |
| Cascade Lake | Skylake-X Refresh (server/HEDT) | 6,85,* (step 6-7) |
i9-10980XE, Xeon W-2295 | -80 mV |
| Skylake | 6th Gen | 6,78,* / 6,94,* / 6,85,* (step 4) |
i7-6700K, i7-6820HQ | -80 mV |
| Broadwell | 5th Gen | 6,61,* / 6,71,* / 6,86,* |
i7-5775C, i5-5675C | -80 mV |
| Haswell | 4th Gen | 6,60,* / 6,69,* |
i7-4790K, i5-4690K | -65 mV |
| Ivy Bridge | 3rd Gen | 6,58,* / 6,62,* |
i7-3770K, i5-3570K | -65 mV |
| Sandy Bridge | 2nd Gen | 6,42,* / 6,45,* |
i7-2600K, i5-2500K | -65 mV |
Notes on Specific Architectures
Arrow Lake & Meteor Lake (Core Ultra)
- Disaggregated tile architecture — compute tile, SoC tile, IO tile are separate dies
- MSR 0x150 / OC Mailbox voltage offset interface still present on ARL-S desktop
- Voltage domains map to compute tile only (P-Core, E-Core, Ring); GT and Uncore have separate VRs outside traditional FIVR scope
- Conservative defaults: IACORE/ECORE -30 mV, RING -20 mV, GT/Uncore 0 mV
- Many OEM BIOSes lock undervolting; if locked, these offsets won't apply
Lunar Lake (Core Ultra 200V, 2nd-gen Core Ultra mobile)
- 2-tile architecture: Compute (Lion Cove P-cores, no HT + Skymont E-cores) + Platform Controller (SoC, Xe2 Battlemage GPU, Media, IO)
- On-package LPDDR5X — no discrete memory controller
- DLVR voltage regulation throughout (same as Arrow Lake)
- Profile included in UnderVolter (
vcfg_q_lunarlake_client) — conservative defaults applied - OC Mailbox heavily restricted on production silicon — VR topology discovery disabled; voltage offsets via MSR 0x150 attempted but may be silently dropped by firmware on locked SKUs
- VR bit layout for LNL not yet publicly reverse-engineered — to be revisited when community data matures
Raptor Lake Refresh (14th Gen Desktop, 14th Gen HX Mobile)
- Die-identical to Raptor Lake — same FIVR/OC Mailbox topology, same voltage offset behaviour
- Desktop CPUID
6,191,*(BF02, BF03); mobile HX CPUID6,186,4(BA04) - All Alder Lake / Raptor Lake INI templates apply unchanged
Tiger Lake (11th Gen Mobile)
- All-P-Core design (Willow Cove) — no E-Core domain;
OffsetVolts_ECOREhas no effect GTSLICEandGTUNSLICEdomains respond to offsets similarly to Skylake generation6,140,*= TGL-U (15 W);6,141,*= TGL-H (35–45 W)
Comet Lake (10th Gen)
- Higher failure rate at aggressive undervolts compared to other generations
- Community reports: -50 mV shows ~5% failure rate; -120 mV is risky
- Conservative defaults: -40 mV P-Core, -30 mV Ring
Coffee Lake (8th/9th Gen)
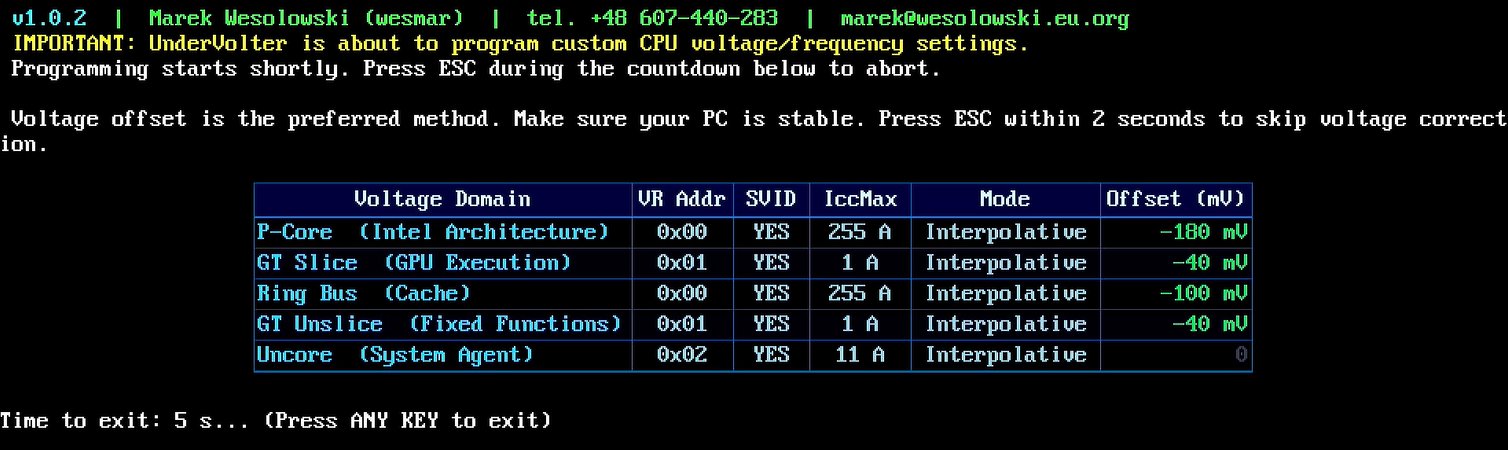
- User-tested values included: -180 mV P-Core, -100 mV Ring (i7-9750H)
- Excellent undervolting headroom on most samples; well-documented in overclocking communities
Hybrid Architecture (Alder Lake and newer)
- Separate P-Core and E-Core voltage domains
- Ring domain often shares voltage plane with E-Cores on desktop variants
- GT Slice/Uncore domains may respond independently
- Keep IACORE/RING/ECORE offsets close (ideally within ~20-30 mV) to avoid instability
CPU Detection Strategy
DetectCpu() uses a two-pass match against gCpuConfigTable:
- Pass 1 — exact match: matches
{family, model, stepping}exactly. Preserves precise behaviour for every known CPU revision in the table. - Pass 2 — model fallback: if Pass 1 misses, retries with
{family, model}only — picks the first sibling entry in table order and prints a warning. Future microcode revisions of known models (e.g. a hypothetical RPL-S D0 stepping) get detected automatically instead of falling through to the "Unknown CPU" warning path.
Entries within a single (family, model) pair share the same uArch and VR template by design, so the fallback is safe — only the displayed stepping label drifts. The warning makes the substitution visible to the user. Output shows CPUID values in both decimal and hex for cross-referencing with Intel documentation:
Detected CPU: RaptorLake, family: 6 (0x6), model: 191 (0xBF), stepping: 2 (0x2)Voltage Domains
UnderVolter programs the following voltage domains via FIVR (Fully Integrated Voltage Regulator):
| Domain | INI Name | Description | Typical Safe Offset |
|---|---|---|---|
| IACORE | OffsetVolts_IACORE |
P-Cores (Performance cores) | -80 mV |
| ECORE | OffsetVolts_ECORE |
E-Cores (Efficiency cores, hybrid CPUs only) | -80 mV |
| RING | OffsetVolts_RING |
Ring bus, LLC, memory controller | -60 mV |
| UNCORE | OffsetVolts_UNCORE |
System Agent, iGPU (non-GT) | -50 mV |
| GTSLICE | OffsetVolts_GTSLICE |
Graphics execution units | -40 mV |
| GTUNSLICE | OffsetVolts_GTUNSLICE |
Graphics unsliced resources | -40 mV |
Voltage Offset Encoding
UnderVolter uses Intel's native MSR 0x150 voltage offset encoding:
| Range | Resolution | Step Size |
|---|---|---|
| -250 mV to +250 mV | ~0.5 mV | 1/256 of range |
The encoding table (OffsetVolts_S11[256]) maps linear mV values to the nonlinear MSR format required by Intel's voltage regulator.
ICC Max Configuration
Maximum current limits can be set per domain:
IccMax_IACORE = 65535    ; 65535 = unlimited (MAX)
IccMax_RING = 65535
IccMax_ECORE = 65535
IccMax_UNCORE = 65535
IccMax_GTSLICE = 0       ; 0 = use default
IccMax_GTUNSLICE = 0
Values are in 1/4 Ampere units (e.g., 620 = 155 A).
Power Limits
UnderVolter supports comprehensive power limit programming across multiple interfaces:
MSR Power Limits (Per-Package)
| Limit | INI Parameter | Description | Typical Value |
|---|---|---|---|
| PL1 | MsrPkgPL1_Power |
Long-term power limit (TDP) | 4294967295 (unlimited) |
| PL2 | MsrPkgPL2_Power |
Short-term power limit (28-56 sec) | 4294967295 (unlimited) |
| PL2 Time | MsrPkgPL_Time |
PL2 time window | 4294967295 (max) |
| PL3 | MsrPkgPL3_Power |
Peak power limit (ms range) | 4294967295 |
| PL4 | MsrPkgPL4_Current |
Current limit (A × 256) | 4294967295 |
| PP0 | MsrPkgPP0_Power |
Core power limit | 4294967295 |
MMIO Power Limits (Platform-Wide)
| Limit | INI Parameter | Description |
|---|---|---|
| MMIO PL1 | MmioPkgPL1_Power |
Package power limit via MMIO |
| MMIO PL2 | MmioPkgPL2_Power |
Package PL2 via MMIO |
| PSys PL1 | PlatformPL1_Power |
Total package + platform power |
| PSys PL2 | PlatformPL2_Power |
Platform short-term limit |
Power Limit Locking
UnderVolter can lock power limit registers to prevent OS modification:
LockMsrPkgPL12 = 1        ; Lock MSR PL1/PL2
LockMsrPkgPL3 = 1         ; Lock PL3
LockMsrPkgPL4 = 1         ; Lock PL4
LockMsrPP0 = 1            ; Lock PP0
LockPlatformPL = 1        ; Lock PSys limits
LockMmioPkgPL12 = 1       ; Lock MMIO PL1/PL2
cTDP Control
Configurable TDP levels allow dynamic TDP selection:
MaxCTDPLevel = 0          ; Maximum cTDP level (0 = nominal)
TdpControlLock = 1        ; Lock cTDP selection
Safety Features
UnderVolter implements multiple layers of safety mechanisms. The full startup sequence is:
CPU detected?
- No → Unknown CPU warning (F10 / 30 s) → abort or continue
- Yes → ESC window (2 s) → abort or apply settings
1. Unknown CPU Warning (F10 / 30 seconds)
If the detected CPU is not in the database, UnderVolter shows this message and starts a 30-second countdown:
WARNING: Detected CPU (model: X, family: Y, stepping: Z) is not known!
 It is likely that proceeding further with hardware programming will result
 in unpredictable behavior or with the system hang/reboot.

 If you are a BIOS engineer or otherwise familiar with the detected CPU params
 please edit CpuData.c and extend it with the detected CPU model/family/stepping
 and its capabilities. Further changes to the UnderVolter code might be necessary.

 Press F10 key within the next 30 seconds to IGNORE this warning.
 Otherwise, UnderVolter will exit with no changes to the system.
The countdown is implemented as a UEFI timer event (TimerRelative, 300 000 000 × 100 ns = 30 s). UnderVolter blocks, waiting for either a keypress or the timer to fire.
| Action | Result |
|---|---|
| F10 pressed within 30 s | Prints Overriding unknown CPU detection... → continues to ESC window and hardware programming |
| Any other key / timeout | Prints Programming aborted. → exits immediately with EFI_ABORTED, no hardware changes |
2. Emergency Exit Window (ESC / 2 seconds)
Shown before any hardware programming begins. Duration: exactly 2 seconds (10 iterations × 20 substeps × 10 ms stall). A green progress bar fills across the screen.
 Voltage offset is the preferred method. Make sure your PC is stable.
 Press ESC within 2 seconds to skip voltage correction.

[████████████████████░░░░░░░░░░░░░░░░░░░░] 50%| Action | Result |
|---|---|
| ESC pressed | Prints Aborting. → exits immediately with EFI_SUCCESS — voltage programming, power limits, turbo ratios are all skipped |
| No key / timeout | Continues to full hardware programming |
What ESC skips: ApplyPolicy(), self-test, the results table, and the exit delay countdown. UnderVolter calls RemoveAllInterruptOverrides() and exits immediately with EFI_SUCCESS — no hardware changes are made.
What ESC does NOT skip: CPU detection, platform initialization, and the 2-second countdown window itself.
3. Missing INI — All-Disabled Safe Defaults
If UnderVolter.ini is not found on any volume:
WARNING: UnderVolter.ini not found! Using safe fallback defaults.Safe defaults disable every programming operation:
| Setting | Safe default |
|---|---|
| Voltage offsets | 0 mV (no change) |
| Power limits | not programmed |
| Turbo ratios | not programmed |
| IccMax | not programmed |
| V/F curves | not programmed |
| Power tweaks (EETurbo, RaceToHalt) | disabled |
UnderVolter continues running, shows the console output, and exits normally — the system is completely untouched.
4. Conservative Profile Defaults
All built-in profiles include a 20% safety margin relative to community-reported stable values:
| Architecture | Community Stable | Safe Default (20% margin) |
|---|---|---|
| Raptor Lake | -100 to -150 mV | -80 mV |
| Alder Lake | -100 to -150 mV | -80 mV |
| Comet Lake | -50 mV (5% failure) | -40 mV |
| Coffee Lake | -150 to -200 mV | -180 mV (user tested) |
5. Self-Test Mode
Optional power management self-test (runs after voltage programming):
SelfTestMaxRuns = 0 ; 0 = disabled, >0 = run N iterations6. Watchdog Timer Control
UEFI watchdog timer can be disabled to prevent a firmware timeout reset during long operations:
DisableFirmwareWDT = 0 ; 0 = keep enabled, 1 = disable7. Safe ASM Interrupt Handler
Installs a custom UEFI interrupt handler before MSR programming to catch CPU exceptions and prevent a triple fault (system hang) if an MSR write fails:
EnableSaferAsm = 1 ; 1 = install safe handler (default), 0 = disableConfiguration File
UnderVolter uses UnderVolter.ini for all configuration settings. The file is parsed at startup and applies settings based on detected CPU architecture.
INI File Search Order
On startup, UnderVolter.efi searches for its configuration file across all mounted volumes using the following strategy. The same inner search is applied to each volume:
Inner search — per volume (in order):
- Dynamic path — derived at runtime from
LoadedImage->FilePath: extracts the directory containingUnderVolter.efiitself and appendsUnderVolter.ini. IfFilePathisNULLor path parsing fails, this step is skipped. - Fixed fallback paths — tried in this exact order if the dynamic path fails or is unavailable:
| # | Path | Deployment scenario |
|---|---|---|
| 1 | \EFI\OC\Drivers\UnderVolter.ini |
OpenCore — Drivers |
| 2 | \EFI\OC\Tools\UnderVolter.ini |
OpenCore — Tools |
| 3 | \EFI\OC\UnderVolter.ini |
OpenCore — root |
| 4 | \EFI\Microsoft\Boot\UnderVolter.ini |
Windows Boot Manager |
| 5 | \EFI\Boot\UnderVolter.ini |
Generic EFI / USB boot |
| 6 | \EFI\UnderVolter.ini |
Generic EFI root |
| 7 | \UnderVolter.ini |
ESP root |
Volume search order (outer loop):
LoadedImage->DeviceHandledirectly — the partition from whichUnderVolter.efiwas loaded. Applies the inner search above. Works in QEMU and on standard UEFI firmware.- All
SimpleFileSystemhandles — if Step 1 fails (common when OpenCore remaps the device handle to a controller/disk handle rather than a partition handle), UnderVolter enumerates every mounted FAT volume and applies the inner search to each in turn, stopping at the first match.
If no INI file is found on any volume:
UnderVolter prints a warning to the console:
WARNING: UnderVolter.ini not found! Using safe fallback defaults.Then continues with all-disabled safe defaults: no voltage programming, no power limit changes, no turbo modifications — the system remains completely untouched. UnderVolter still runs to completion and shows the exit delay screen.
Global Settings
[Global]
; Program power tweaks (EETurbo, RaceToHalt, cTDP)
ProgramPowerTweaks = 1

; Enable Energy Efficient Turbo (reduces frequency at light loads for efficiency)
EnableEETurbo = 1

; Enable Race to Halt (boost clock aggressively, complete work fast, drop to idle)
EnableRaceToHalt = 1

; Maximum configurable TDP level (0 = nominal TDP)
MaxCTDPLevel = 0

; Lock cTDP register after programming (prevents OS from changing it)
TdpControlLock = 1

; Seconds to display the results table before exiting.
; Set to 0 to exit immediately (useful in automated boot chains).
; When INI is not found, this is forced to 0.
DelaySeconds = 3

; Quiet mode: 0 = show full UI and progress bars; 1 = silent (no output).
; In quiet mode: startup animation is skipped, no console output is produced,
; warnings (unknown CPU, missing INI) are suppressed, and the exit delay
; uses a plain stall instead of an interactive countdown.
; Use QuietMode = 1 in production boot chains where output is not visible.
QuietMode = 0

; === Firmware Behavior Flags ===

; Lock OC Mailbox after programming to prevent OS from overriding voltage settings.
PostProgrammingOcLock = 1

; Show 2-second ESC window before voltage programming (recommended: 1).
EmergencyExit = 1

; Install safe ASM interrupt handler before MSR writes (recommended: 1).
; Catches CPU exceptions and prevents triple faults on unsupported MSR access.
EnableSaferAsm = 1

; Disable UEFI watchdog timer during programming (0 = keep enabled).
DisableFirmwareWDT = 0

; Run power management self-test after programming (0 = disabled).
SelfTestMaxRuns = 0

; Show voltage domain table after programming (1 = show, 0 = hide).
PrintPackageConfig = 1

; Show V/F curve points in the results table (1 = show, 0 = hide).
PrintVFPoints_PostProgram = 1
DelaySeconds — how it works:
In normal mode (QuietMode = 0), UnderVolter displays a countdown after the results table:
Time to exit: 3 s... (Press ANY KEY to exit)The countdown polls the keyboard every 10 ms — press any key to exit immediately without waiting. Set DelaySeconds = 0 to skip the delay entirely (boot chain use case).
In quiet mode (QuietMode = 1), the delay becomes a plain gBS->Stall() with no console output and no key polling.
Profile Example: Coffee Lake
[Profile.CoffeeLake]
Architecture = "CoffeeLake"

; Forced turbo ratios (0 = use default)
ForcedRatioForPCoreCounts = 0
ForcedRatioForECoreCounts = 0

; ICC Max (in 1/4 A units, 65535 = MAX)
IccMax_IACORE = 65535
IccMax_RING = 65535
IccMax_UNCORE = 65535
IccMax_ECORE = 65535
IccMax_GTSLICE = 0
IccMax_GTUNSLICE = 0

; Voltage offsets (mV) — user tested values
OffsetVolts_IACORE = -180
OffsetVolts_RING = -100
OffsetVolts_UNCORE = 0
OffsetVolts_GTSLICE = -40
OffsetVolts_GTUNSLICE = -40

; Power Limits (MSR)
ProgramPL12_MSR = 1
EnableMsrPkgPL1 = 1
EnableMsrPkgPL2 = 1
MsrPkgPL1_Power = 4294967295    ; Unlimited
MsrPkgPL2_Power = 4294967295    ; Unlimited
MsrPkgPL_Time = 4294967295      ; Maximum time window
ClampMsrPkgPL12 = 0
LockMsrPkgPL12 = 1

; Power Limits (MMIO)
ProgramPL12_MMIO = 0
LockMmioPkgPL12 = 0

; Platform (PSys) Power Limits
ProgramPL12_PSys = 0
LockPlatformPL = 0

; PL3, PL4, PP0
ProgramPL3 = 0
ProgramPL4 = 0
ProgramPP0 = 0
NVRAM Setup Variable Patching
[SetupVar]
; Set to 1 to enable patching on next run.
; Once all offsets already hold the target values, this becomes a no-op
; (no write, no reboot) — safe to leave permanently at 1.
NvramPatchEnabled = 0

; Reboot immediately after a confirmed write (recommended).
; If = 0, patches are written but you must reboot manually.
NvramPatchReboot = 1

; Format: Patch_N = 0xOFFSET : 0xVALUE  (hex, up to 16 entries)
Patch_0 = 0x6ED : 0x00    ; CFG Lock
Patch_1 = 0x789 : 0x00    ; OC Lock
See NVRAM Setup Variable Patching for full details, including how to find offsets for your machine.
Secure Boot & SelfEnroll
[SecureBoot]
; Set to 1 to auto-enroll the embedded root CA certificate into UEFI db/KEK/PK.
; Idempotent — if the cert is already present, this is a no-op (no write, no reboot).
; Safe to leave permanently at 1 after the first successful enrollment.
SelfEnroll = 1

; Warm reset after enrollment (recommended — Secure Boot takes effect on next POST).
SelfEnrollReboot = 1

; After enrollment, attempt the UEFI 2.5+ Audit→Deployed Mode transition by writing
; DeployedMode=1 to the EFI global variable namespace. Non-fatal if firmware rejects it.
; Set to 0 if you prefer to switch to Deployed Mode manually in BIOS.
TryDeployedMode = 1

; After enrollment, offer to reboot directly into BIOS/firmware Setup UI.
; Y within the timeout → sets OsIndications (same mechanism as Windows Shift+Restart → UEFI).
; N or timeout → normal reboot (manual BIOS visit required to confirm Deployed Mode).
BootToFirmwareUI = 1
BootToFirmwareUITimeout = 5

; .auth file enrollment — advanced, separate from SelfEnroll.
; Set SecureBootEnroll = 1 and point KeyDir to a folder on ESP
; containing PK.auth / KEK.auth / db.auth / dbx.auth files.
SecureBootEnroll = 0
KeyDir =
See Secure Boot & SelfEnroll for the full one-time setup procedure.
V/F Point Programming (Advanced)
UnderVolter supports custom voltage/frequency point programming:
[Profile.RaptorLake]
; Enable V/F point programming for IACORE
Program_VF_Points_IACORE = 3

; V/F Point 0: Frequency (MHz) : Offset (mV)
VF_Point_0_IACORE = 800:-50
VF_Point_1_IACORE = 3200:-80
VF_Point_2_IACORE = 5200:-100
NVRAM Setup Variable Patching
UnderVolter includes a built-in NVRAM patcher — no GRUB, no EFI Shell, no external tools needed. It uses the standard UEFI SetVariable / GetVariable API to patch bytes inside the BIOS Setup EFI variable directly from UnderVolter.ini.
Warning: Editing BIOS variables incorrectly can render a system unbootable. If something goes wrong, remove both the main battery and the CMOS coin cell (CR2032) to reset NVRAM — sometimes waiting up to an hour is required. Proceed at your own risk.
How It Works
The UEFI firmware stores all hidden BIOS settings in a flat byte array called Setup (EFI variable, GUID EC87D643-EBA4-4BB5-A1E5-3F3E36B20DA9). Every setting — including CFG Lock and OC Lock — has a fixed offset within that array. Patching a single byte at the right offset is equivalent to toggling the setting in BIOS Setup UI.
Execution flow:
- UnderVolter reads the full
Setupvariable viaGetVariable - Compares each configured
Patch_Noffset against the desired value - If all bytes already match — no write, no reboot (prevents infinite restart loops)
- If any byte differs — patches the buffer, calls
SetVariable, then reads back and verifies - Before reboot, writes
BootNext = BootCurrentso the next firmware BDS pass returns to the same boot entry — defensive against firmware quirks (some Lenovo Legion units skip to the next BootOrder entry after a warm reset) - Reboot is only triggered when the write is confirmed — fail-closed design; a silent firmware write failure does not cause a reboot loop
- After the reboot, BIOS POST reads the new values and leaves the MSR locks unset — UnderVolter can now program voltage offsets normally
Offset width: Patch_N offsets are parsed as 24-bit values (cap 0xFFFFFF). This accommodates Dell Precision-class workstation BIOSes with Setup variables up to ~96 KB; the historical 16-bit cap (0xFFFF) is no longer the limit. The real bound at write time is the live dataSize returned by GetVariable() — offsets ≥ that size are skipped with a diagnostic.
Section header parsing: the INI parser tolerates whitespace inside section brackets — [SetupVar], [ SetupVar ], and [SetupVar ] all match. Same applies to [SecureBoot].
Finding Offsets for Your Machine
This is a one-time offline research step — done once on any PC, not required at deployment time. If your machine is already in the Confirmed Offsets table below, skip this entirely.
The byte offsets for CFG Lock and OC Lock vary between BIOS versions and board models. You find them by decoding the IFR (Internal Forms Representation) embedded in your BIOS firmware image. IFRExtractor.exe shipped in other-tools/ is a standalone tool for exactly this — no installation required.
Tools for offset discovery:
| Tool | Purpose |
|---|---|
| FPTW64.exe | Dump BIOS firmware image (FPTW64.exe -d bios.rom -bios) — Intel Flash Programming Tool, obtain from your chipset support package |
UEFITool (other-tools/) |
Open the ROM image and extract the Setup DXE module (.ffs file) |
IFRExtractor.exe (other-tools/) |
Decode the extracted module → human-readable text with VarOffset values |
Once you have the offsets, you only need UnderVolter.ini — no other tools run at boot time.
Steps:
- Dump ROM:
FPTW64.exe -d bios.rom -bios - Open
bios.romin UEFITool → Ctrl+F → Text search →Overclocking Lock - Right-click the parent
.ffsfile → Extract as is - Open IFRExtractor.exe (
other-tools/), load the.ffs→ save.txt(CLI:IFRExtractor.exe input.ffs output.txt) - Search the
.txtforOverclocking LockandCFG Lock— note the VarOffset value for each
Example IFR output (Dell XPS 15 7590, BIOS v1.20):
VarStore: VarStoreId: 0x1, Name: Setup, GUID: EC87D643-EBA4-4BB5-A1E5-3F3E36B20DA9, Size: 0x17FD

CFG Lock          →  VarStore: 0x1 (Setup),  VarOffset: 0x6ED
Overclocking Lock →  VarStore: 0x1 (Setup),  VarOffset: 0x789
For UnderVolter's built-in patcher, only the VarOffset value matters — the VarStore ID is irrelevant. UnderVolter always targets the Setup variable by its GUID directly.
Configuration
[SetupVar]
; 1 = apply patches on this run; 0 = skip entirely.
; After a successful patch+reboot, values already match → becomes a no-op.
; Safe to leave at 1 permanently.
NvramPatchEnabled = 1

; 1 = reboot immediately after confirmed write (recommended).
; 0 = write and continue (patches activate on next manual reboot).
NvramPatchReboot = 1

; Patch_N = 0xOFFSET : 0xVALUE  (hex; up to 16 entries; N is arbitrary)
Patch_0 = 0x6ED : 0x00    ; CFG Lock → disabled
Patch_1 = 0x789 : 0x00    ; OC Lock  → disabled
One-time procedure:
- Set
NvramPatchEnabled = 1, runUnderVolter.efi - Output shows each offset: current → new value, then
Write verified - 3-second countdown before warm reset (press any key to cancel)
- After reboot — voltage programming works normally
- Leave
NvramPatchEnabled = 1; subsequent runs detect no change and skip
To re-enable locks (test or restore):
Patch_0 = 0x6ED : 0x01    ; CFG Lock → enabled
Patch_1 = 0x789 : 0x01    ; OC Lock  → enabled
Confirmed Offsets
| Machine | CFG Lock offset | OC Lock offset | VarStore |
|---|---|---|---|
| Dell XPS 15 7590 (9th Gen, i7-9750H, BIOS v1.20) | 0x6ED |
0x789 |
Setup (0x1) |
| Dell Vostro 7500 | 0x3E |
0xDA |
CpuSetup (0x3) |
Offsets vary between BIOS versions and machine models — always verify from your own IFR dump before patching.
BIOS Unlocking
Many OEM laptops and some desktop systems ship with Overclocking Lock and CFG Lock enabled in BIOS, which blocks MSR 0x150 voltage offset writes. UnderVolter will silently skip voltage programming on such machines unless these locks are cleared first.
UnderVolter handles this itself — no external tools, no GRUB shell, no modified bootloader required. Configure the [SetupVar] section in UnderVolter.ini with the byte offsets for your machine (see NVRAM Setup Variable Patching), set NvramPatchEnabled = 1, and UnderVolter will patch the locks on the first boot, verify the write, reboot once, and proceed to voltage programming on the next run. The offset comparison is done on every subsequent boot — if the locks are already cleared, no write and no reboot occur.
To find the correct byte offsets for your BIOS, use IFRExtractor.exe shipped in other-tools/ — see Finding Offsets for Your Machine for the full procedure. This is a one-time offline research task; no external tools run at boot time.
Known offsets for reference:
| Machine | CFG Lock offset | OC Lock offset | VarStore |
|---|---|---|---|
| Dell XPS 15 7590 (9th Gen, i7-9750H, BIOS v1.20) | 0x6ED |
0x789 |
Setup (0x1) |
| Dell Vostro 7500 | 0x3E |
0xDA |
CpuSetup (0x3) |
Offsets vary between BIOS versions and machine models — always verify from your own IFR dump before patching.
Secure Boot & SelfEnroll
UnderVolter includes a complete self-enrollment workflow that installs its own root CA certificate into UEFI Secure Boot — directly from the UEFI Shell, with no external tools, no Linux environment, and no MOK manager. Once enrolled, every future UnderVolter.efi signed with the same leaf certificate is trusted by firmware automatically.
Prerequisites: Secure Boot enrollment requires UEFI 2.3.1 or later firmware. Sandy Bridge (2nd Gen, 2011) boards that shipped before Secure Boot was standardised may lack
SetupModesupport entirely — check for a BIOS update that adds Secure Boot options before attempting. If the BIOS has no Secure Boot menu at all, SelfEnroll cannot work on that board.
How SelfEnroll Works
One-time procedure summary:
- Generate certificates (
sign.ps1 -Create— once) - Build and sign EFI (
build.ps1) - Set
SelfEnroll = 1inUnderVolter.ini - Copy
bin\*toESP:\EFI\UnderVolter\ - Enter BIOS Setup → clear/disable Secure Boot PK → Setup Mode active → reboot
- Boot to UEFI Shell → run
UnderVolter.efi - Observe
[SBE] db: OK KEK: OK PK: OK→ automatic reboot - Enter BIOS (or let
BootToFirmwareUItake you there) → confirm Secure Boot: Enabled, User Mode - Done — all future
UnderVolter.efibuilds with the same signing cert are trusted automatically
Step 1 — Generate Certificates (Once)
Certificates are generated using OpenSSL (available with Git for Windows). Run in Git Bash (not PowerShell) from the project root:
A — Create password file:
cd Signer/cert
printf '%s' "YourPasswordMin20Chars" > undervolter-standard-signing.pwd
B — Root CA (10-year validity):
openssl genrsa -out root.key 4096
openssl req -new -x509 -days 3650 -key root.key -out root.crt \
  -subj "//CN=UnderVolter Root CA" \
  -addext "basicConstraints=critical,CA:TRUE,pathlen:1" \
  -addext "keyUsage=critical,keyCertSign,cRLSign,digitalSignature"
C — Signing certificate (5-year validity):
openssl genrsa -out signing.key 4096
openssl req -new -key signing.key -out signing.csr -subj "//CN=UnderVolter"
printf "basicConstraints=critical,CA:FALSE\nkeyUsage=critical,digitalSignature\nextendedKeyUsage=1.3.6.1.4.1.311.10.3.6,1.3.6.1.5.5.7.3.3\n" > ext.txt
CERT_PWD=$(cat undervolter-standard-signing.pwd)
openssl x509 -req -days 1825 -in signing.csr -CA root.crt -CAkey root.key \
  -CAcreateserial -out signing.crt -extfile ext.txt
D — Pack to PFX:
openssl pkcs12 -export \
  -keypbe PBE-SHA1-3DES -certpbe PBE-SHA1-3DES -macalg sha1 \
  -out undervolter-standard-signing.pfx \
  -inkey signing.key -in signing.crt -certfile root.crt \
  -passout "pass:$CERT_PWD"
E — Export to DER (binary):
openssl x509 -in root.crt    -outform DER -out undervolter-standard-root.cer
openssl x509 -in signing.crt -outform DER -out undervolter-standard-signing.cer
F — Remove temporary files (keep .pfx, .pwd, .cer):
rm root.key signing.key signing.csr signing.crt root.crt root.srl ext.txtFiles remaining in Signer\cert\:
| File | Description | Security |
|---|---|---|
undervolter-standard-root.cer |
Root CA public cert (DER) | Public — backup only |
undervolter-standard-signing.cer |
Signing cert public (DER) | Public — backup only |
undervolter-standard-signing.pfx |
Signing cert + private key | Keep secret — never upload to ESP |
undervolter-standard-signing.pwd |
PFX password (plain text) | Keep secret — never upload to ESP |
signing.config.json |
Name configuration | Safe to leave |
Note:
sign.ps1 -Createis not used for certificate generation. Use the OpenSSL commands above —sign.ps1is only called automatically bybuild.ps1for signing the compiled EFI.
Step 2 — Build and Sign EFI
.\build.ps1build.ps1 performs these steps automatically:
embed-cert.ps1— readsundervolter-standard-root.cer, embeds raw bytes intosrc\UnderVolterCert.has a C array (UV_CERT_DER_SIZE > 0confirms embedding)- Compile — builds
UnderVolter.slnin Release/x64; the root CA is compiled into the EFI binary sign.ps1— signsbin\UnderVolter.efiwith Authenticode (SHA-256) using the PFX
Verify the signature in Explorer: right-click UnderVolter.efi → Properties → Digital Signatures → should show an "UnderVolter" entry.
Step 3 — Prepare ESP
Set SelfEnroll = 1 in bin\UnderVolter.ini (section [SecureBoot]), then copy to the EFI partition:
ESP:\
  EFI\
    UnderVolter\
      UnderVolter.efi    ← from bin\ (signed, contains embedded cert)
      UnderVolter.ini    ← SelfEnroll = 1
      Loader.efi         ← optional
Access ESP from Windows (cmd as Administrator):
diskpart
list vol
select vol X        (X = ESP volume number, type "System")
assign letter=Z
exit
xcopy /Y bin\UnderVolter.efi Z:\EFI\UnderVolter\
xcopy /Y bin\UnderVolter.ini Z:\EFI\UnderVolter\
diskpart
select vol X
remove letter=Z
Do NOT copy to ESP:
Signer\cert\*.pfx— private key, stays on your PCSigner\cert\*.pwd— password, stays on your PCsrc\— source code, not needed
Step 4 — Enter BIOS Setup Mode
UEFI Setup Mode is the state in which firmware accepts unauthenticated writes to Secure Boot variables. Required for the first SelfEnroll run.
Sandy Bridge (2nd Gen, Family 6 Model 42/45) — compatibility note: Sandy Bridge launched in 2011, before UEFI 2.3.1 (2012) standardised Secure Boot. Many Sandy Bridge OEM motherboards shipped without Secure Boot support — the BIOS simply has no Secure Boot menu. On such boards, SelfEnroll cannot work. If your Sandy Bridge BIOS does have a Secure Boot section (common on boards that received BIOS updates through 2012–2013, and on workstation/server variants), the enrollment procedure works normally — follow the same steps. Entering Setup Mode by clearing the PK is identical regardless of generation.
AMI Aptio (desktop motherboards):
Security → Secure Boot → Secure Boot Mode → Custom
→ Key Management → Delete All Secure Boot Variables (or Delete PK)
→ Save & Reset
InsydeH2O (Dell / HP / Lenovo laptops):
Boot → Secure Boot → Secure Boot Enable → Off
  (or) Security → Secure Boot → Clear Secure Boot Keys
→ Exit → Save Changes and Reset
Dell XPS 15 7590 (Coffee Lake, i7-9750H):
F2 at POST → Boot Configuration → Secure Boot
→ Secure Boot Enable → OFF
→ Apply → Exit → Restart
On Dell, disabling Secure Boot is sufficient — the BIOS enters Audit/Custom Mode automatically. UnderVolter prints SetupMode=0 (Dell Audit/Custom Mode?). Attempting enrollment... and proceeds regardless.
Step 5 — Run UnderVolter from UEFI Shell
Getting a UEFI Shell:
- Option A: Check BIOS Boot menu for a built-in UEFI Shell entry
- Option B: Copy
ShellX64.efi(from tianocore.org) toESP:\EFI\Shell\ShellX64.efiand boot it from the BIOS boot menu (F12) - Option C: Use Ventoy — add
ShellX64.efias a bootable EFI entry
In UEFI Shell:
Shell> map -r
Shell> fs0:
fs0:\> cd EFI\UnderVolter
fs0:\EFI\UnderVolter> UnderVolter.efi
(Try fs0:, fs1:, fs2: until you find the ESP — look for the one with EFI\ directory.)
Step 6 — Normal Enrollment Output
[SBE] SelfEnroll: Setup Mode confirmed. Enrolling root CA certificate...
[SBE]   db:  OK
[SBE]   KEK: OK
[SBE]   PK:  OK
[SBE] SelfEnroll: all keys enrolled. Secure Boot active after reboot.
[SBE]             Future UnderVolter.efi releases signed with the leaf cert are trusted.
[SBE]   DeployedMode: OK — Secure Boot will enforce after reboot.
[SBE] Boot to BIOS/firmware UI? [Y/N] (5s)
Press Y to reboot directly into BIOS Setup (recommended — lets you confirm Secure Boot status), or N / wait for timeout for a normal warm reset.
Step 7 — After Reboot: BIOS Verification and Deployed Mode
This step depends on what TryDeployedMode returned:
Case A — DeployedMode: OK (most firmware):
UnderVolter successfully wrote DeployedMode=1 via the UEFI variable interface (standard UEFI 2.5+ Audit→Deployed transition). Secure Boot is now fully enforced. Enter BIOS to confirm:
Security / Boot / Secure Boot:
  Secure Boot: Enabled
  Mode:        User Mode      ← must NOT say "Setup Mode" or "Audit Mode"
  Platform Key (PK): [present]
If confirmed — enrollment is complete. No further BIOS changes needed.
Case B — DeployedMode: firmware rejected (Dell, some OEM BIOSes):
The firmware does not allow the standard UEFI DeployedMode transition and must be switched manually. Enter BIOS Setup (press F2 / Del / F10 at POST, or use the BootToFirmwareUI prompt) and:
| BIOS type | Where to switch |
|---|---|
| AMI Aptio | Security → Secure Boot → Secure Boot Mode → User (or Standard) |
| InsydeH2O | Security → Secure Boot → Secure Boot Enable → On |
| Dell XPS | Boot Configuration → Secure Boot → Secure Boot Enable → On |
Save and reboot. After this reboot, Secure Boot is enforced (User Mode). Verify again:
Secure Boot: Enabled
Mode:        User Mode
Why this matters: Until the firmware is in User Mode (Deployed), Secure Boot variables can still be overwritten unauthenticated. Writing PK transitions Setup Mode → User Mode in standard UEFI; but on some OEM firmware this transition requires an explicit BIOS UI action even after the PK is set.
After confirmation — set SelfEnroll = 0 in UnderVolter.ini (optional but cleaner). Subsequent runs with SelfEnroll = 1 detect the cert is already present and print certificate already enrolled — no action needed, then continue to normal voltage programming.
Console Messages Reference
| Message | Meaning |
|---|---|
[SBE] SelfEnroll: Setup Mode confirmed. |
Standard UEFI SetupMode=1 detected |
[SBE] SelfEnroll: SetupMode=0 (Dell Audit/Custom Mode?). Attempting enrollment... |
OEM firmware — enrollment attempted anyway |
[SBE] db: OK / KEK: OK / PK: OK |
All three UEFI variables written and verified |
[SBE] SelfEnroll: all keys enrolled. Secure Boot active after reboot. |
Successful enrollment — reboot imminent |
[SBE] DeployedMode: OK |
UEFI 2.5+ Audit→Deployed transition accepted |
[SBE] DeployedMode: firmware rejected (0x...) |
Firmware refused — switch Deployed Mode manually in BIOS |
[SBE] SelfEnroll: certificate already enrolled — no action needed. |
Idempotent — cert present, no write, no reboot |
[SBE] SelfEnroll: no certificate embedded. |
EFI was not built with build.ps1 after cert generation; rebuild |
[SBE] SelfEnroll: not in Setup Mode. |
BIOS PK still set — clear Secure Boot keys in BIOS first |
[SBE] db: FAILED |
Firmware rejected write — verify Setup Mode is active |
[SBE] SelfEnroll: one or more writes failed — NOT rebooting. |
Partial failure — check BIOS Key Management, clear keys, retry |
Subsequent Releases — No BIOS Visit Needed
After the initial enrollment, updating UnderVolter is a simple file copy:
.\build.ps1 # rebuilds and signs with the same cert automaticallyCopy bin\UnderVolter.efi to ESP (replace the old one). The firmware verifies the Authenticode signature against the root CA already in db — the EFI loads and runs normally. No BIOS changes, no re-enrollment.
The root CA certificate in BIOS is valid for 10 years. The signing certificate (Signer\cert\) is valid for 5 years. When the signing cert expires, generate a new one (sign.ps1 -Create -Force) and rebuild — the root CA in BIOS remains valid (unless you also rotate the root key).
Windows Compatibility After SelfEnroll
UnderVolter's SelfEnroll uses APPEND_WRITE mode for db and KEK, preserving existing entries (including the Microsoft CA that Windows depends on). The PK is replaced — this may affect Windows Secure Boot on some configurations.
| Situation | Solution |
|---|---|
| Windows fails to boot after enrollment | BIOS → Restore Factory Keys / Install Default Secure Boot Keys → re-enroll UnderVolter |
| BIOS allows multiple PK entries | No issue — Microsoft CA is preserved in db/KEK by APPEND_WRITE |
| Advanced: keep Microsoft CA in PK | Use .auth file enrollment (SecureBootEnroll = 1) with a combined PK.auth containing both Microsoft and UnderVolter certs |
Deployment Methods
UnderVolter can be deployed in several ways, with or without Loader.efi:
| Method | Executable | Persistence |
|---|---|---|
| OpenCore Driver | UnderVolter.efi directly |
Every boot |
| OpenCore Tool | UnderVolter.efi directly |
On-demand (from boot picker) |
| EFI Shell / startup.nsh | UnderVolter.efi directly |
On-demand or scripted |
Replace BOOTX64.EFI |
Loader.efi as BOOTX64.EFI |
Every boot (USB or EFI partition) |
| BIOS boot entry | Loader.efi (independent entry) |
Every boot, survives OS reinstall |
| Windows Boot Manager | UnderVolter.efi via BCD |
Every boot |
Optional: Loader.efi
Loader.efi is an optional helper that finds and launches UnderVolter.efi automatically — without requiring a fixed path — and then chainloads the normal UEFI boot sequence. It is designed to run transparently before the OS, adding no visible delay when everything succeeds.
UnderVolter.efi works completely independently of Loader: it can be loaded directly by OpenCore, EFI Shell, or the BIOS boot manager without Loader involved at all. Loader is only needed when you want automatic discovery combined with seamless chainloading.
How Loader Finds UnderVolter.efi (4-stage search)
| Stage | Method | Detail |
|---|---|---|
| 1 | Same directory as Loader.efi |
Derived from Loader's own LoadedImage->FilePath; direct file open, no recursion |
| 2 | \EFI\OC\Drivers\ on same device |
OpenCore Drivers directory; direct file open |
| 3 | Recursive search on same device | Depth-first, up to 4 directory levels from root; stops on first match |
| 4 | All EFI System Partitions | Enumerates all SimpleFileSystem handles; on each ESP repeats Stages 2+3 |
Loader identifies an ESP by checking for the presence of the \EFI directory. Only volumes that have \EFI are searched in Stage 4.
What Loader Does After UnderVolter Finishes
Once UnderVolter.efi completes (regardless of whether it succeeded or was skipped with ESC), Loader chainloads the normal boot sequence:
- Checks
BootNextUEFI variable — if set, boots that entry and clearsBootNext - Falls back to
BootOrder— iterates boot entries in order, skipping inactive ones - Skips its own entry (based on
BootCurrent) to prevent infinite loops - Self-loop prevention: Loader checks the partition first and the file path second. An entry on its own partition is skipped when the path matches Loader's own file, ends in
Loader.efi, or ends inBOOTX64.EFI. An entry that names the partition alone, with no file path, resolves to\EFI\Boot\BOOTX64.EFIon that partition and is skipped when Loader itself was started under that name - Windows Boot Manager fallback: if nothing in
BootOrderstarts, Loader looks for\EFI\Microsoft\Boot\bootmgfw.efion every EFI System Partition other than its own
If nothing can be chainloaded, Loader still returns EFI_SUCCESS. UnderVolter has already run by then, and returning an error only makes the firmware show a boot failure dialog before it moves to the next BootOrder entry anyway.
If UnderVolter.efi Is Not Found
Loader skips the UnderVolter step entirely and proceeds directly to chainloading BootNext/BootOrder — the system boots normally with no voltage changes applied.
Typical Use Cases for Loader.efi
- Replace
BOOTX64.EFI— copyLoader.efias\EFI\BOOT\BOOTX64.EFI; it findsUnderVolter.efiin the same directory, runs it, then boots the OS - Standalone BIOS boot entry — add
Loader.efias a UEFI NVRAM boot entry independent of the OS boot manager; survives Windows reinstalls and updates; BIOS runs Loader first in boot order, Loader runs UnderVolter, then chainloads Windows
OpenCore Integration
Installation as UEFI Driver
Add UnderVolter to your OpenCore EFI partition:
EFI/
└── OC/
    ├── Drivers/
    │   └── Undervolter.efi
    ├── Tools/
    │   └── Undervolter.efi    (optional, for manual execution)
    ├── UnderVolter.ini        (configuration file)
    └── config.plist
config.plist Entry
Add to UEFI → Drivers array in config.plist:
<key>Drivers</key>
<array>
    <dict>
        <key>Arguments</key>
        <string></string>
        <key>Comment</key>
        <string>UnderVolter — CPU undervolting utility</string>
        <key>Enabled</key>
        <true/>
        <key>LoadEarly</key>
        <false/>
        <key>Path</key>
        <string>Undervolter.efi</string>
    </dict>
    <!-- Other drivers... -->
</array>
LoadEarly vs LoadLate
| Mode | Behavior | Use Case |
|---|---|---|
LoadEarly = false |
Loaded after OpenCore initialization | Standard usage |
LoadEarly = true |
Loaded before OpenCore drivers | Advanced: apply before other drivers |
Recommended: LoadEarly = false (default)
Optional: Add to UEFI Tools
For manual execution from OpenCore boot picker:
<key>Tools</key>
<array>
    <dict>
        <key>Arguments</key>
        <string></string>
        <key>Comment</key>
        <string>UnderVolter — Manual execution</string>
        <key>Enabled</key>
        <true/>
        <key>LoadEarly</key>
        <false/>
        <key>Path</key>
        <string>Undervolter.efi</string>
    </dict>
</array>
Access via OpenCore Boot Picker → Tools → Undervolter
config.plist Example Section
<key>UEFI</key>
<dict>
    <key>Drivers</key>
    <array>
        <dict>
            <key>Arguments</key>
            <string></string>
            <key>Comment</key>
            <string></string>
            <key>Enabled</key>
            <true/>
            <key>LoadEarly</key>
            <false/>
            <key>Path</key>
            <string>Undervolter.efi</string>
        </dict>
        <dict>
            <key>Arguments</key>
            <string></string>
            <key>Comment</key>
            <string></string>
            <key>Enabled</key>
            <true/>
            <key>LoadEarly</key>
            <false/>
            <key>Path</key>
            <string>OpenRuntime.efi</string>
        </dict>
    </array>
    <!-- Rest of UEFI configuration -->
</dict>
OC Configurator Users
If using OC Configurator or similar GUI tools:
- Open
config.plistin OC Configurator - Navigate to UEFI → Drivers
- Click + to add new driver
- Set Path to
Undervolter.efi - Set Enabled to ✓
- Set Comment to
UnderVolter — CPU undervolting - Save and reboot
EFI Boot Method
Boot from USB Drive
Create a bootable UEFI USB drive:
USB Drive (FAT32):
└── EFI/
    └── BOOT/
        ├── BOOTX64.EFI       (copy of UnderVolter.efi)
        └── UnderVolter.ini   (configuration file)
Steps:
- Format USB drive as FAT32
- Create directory structure:
EFI\BOOT\ - Copy
UnderVolter.efitoEFI\BOOT\BOOTX64.EFI - Copy
UnderVolter.initoEFI\BOOT\UnderVolter.ini - Boot from USB (press F12/F8/Del during POST)
- UnderVolter executes automatically
EFI Shell Execution
If your motherboard has built-in EFI Shell:
FS0:\> cd \EFI\Boot
FS0:\EFI\Boot> UnderVolter.efi
Or with full path:
FS0:\> \EFI\Boot\UnderVolter.efistartup.nsh Script
Create startup.nsh in EFI partition root:
@echo -off
fs0:\EFI\Boot\UnderVolter.efi
echo.
echo === Completed. Press Enter to exit ===
pause
Windows Boot Manager
Method 1: Copy to Boot Directory
C:\EFI\Microsoft\Boot\
├── bootmgfw.efi
├── UnderVolter.efi
└── UnderVolter.ini
Add to BCD store:
bcdedit /copy {bootmgr} /d "UnderVolter"
bcdedit /set {GUID} path \EFI\Microsoft\Boot\UnderVolter.efi
bcdedit /set {GUID} device partition=C:
bcdedit /displayorder {GUID} /addlast
bcdedit /timeout 5
Replace {GUID} with the identifier returned by bcdedit /copy.
Method 2: Dual-Boot Entry
Create separate EFI partition for UnderVolter:
diskpart
create partition efi size=100
format quick fs=fat32 label="UV"
assign letter=V
exit

xcopy /Y UnderVolter.efi V:\EFI\Boot\BOOTX64.EFI
xcopy /Y UnderVolter.ini V:\EFI\Boot\

bcdedit /copy {bootmgr} /d "UnderVolter"
bcdedit /set {GUID} path \EFI\Boot\BOOTX64.EFI
bcdedit /set {GUID} device partition=V:
Build System
Requirements
- Visual Studio 2026 or later with C++ desktop development workload
- Windows SDK (included with VS)
- PowerShell 5.1 or later (for build scripts)
Build Process
# Navigate to project root
cd C:\Projekty\UnderVolter

# Run build script
.\build.ps1
Build Steps:
- Locate MSBuild — Uses
vswhere.exeto find Visual Studio installation - Clean Directories — Removes
bin\and.vs\cache directories - Build Release x64 — Compiles
UnderVolter.slnin Release/x64 configuration - Copy Output — Copies
UnderVolter.efi,Loader.efi, andUnderVolter.initobin\ - Set Timestamp — Sets file dates to
2030-01-01 00:00:00for reproducible builds - Clean Build Output — Removes intermediate files from
x64\Release\
Output Files
After successful build:
bin/
├── UnderVolter.efi    (main application)
├── Loader.efi         (optional loader for advanced configurations)
└── UnderVolter.ini    (configuration template)
Static Build Signature
All files are timestamped with 2030-01-01 00:00:00 for:
- Reproducible builds
- Deterministic versioning
- Easy identification of build date
QEMU Testing
test-qemu.zip contains a ready-to-use QEMU/OVMF testing environment — extract and run run-qemu.ps1 to test UnderVolter without real hardware.
Requirements
| Component | Version / Notes |
|---|---|
| QEMU for Windows | ≥ 9.0 recommended; tested with 10.2.90 (v11.0.0-rc0); must include GTK display and bochs-display device support — use the official qemu.org Windows build |
| OVMF firmware | edk2-x86_64-code.fd — bundled with QEMU at C:\Program Files\qemu\share\ |
| OVMF variables | ovmf-vars.fd — included in test-qemu.zip; stores UEFI NVRAM state between runs |
| Working directory | C:\vm\qemu — the script copies binaries here and uses this directory as the virtual FAT disk |
Quick Start
# 1. Extract test-qemu.zip to C:\vm\qemu
# 2. Build UnderVolter (or use pre-built binaries from UnderVolter.7z)
# 3. Run:
.\run-qemu.ps1
The script automatically:
- Copies the latest
UnderVolter.efiandUnderVolter.inifrombin\intoC:\vm\qemu\if they have changed - Creates
startup.nshif missing — EFI Shell auto-runsUnderVolter.efion boot - Mounts
C:\vm\qemu\as a virtual FAT drive (fat:rw:via VirtIO) — the EFI Shell sees it asFS0: - Uses
bochs-displayat 1920×1080 with OVMF resolution hints viafw_cfg(higher quality than standard VGA) - Logs QEMU errors to
C:\vm\qemu\qemu-error.log
Simulated CPU
The test environment emulates an Intel i7-9750H (Coffee Lake) — the same CPUID that is matched by UnderVolter's CoffeeLake profile:
-cpu "qemu64,family=6,model=158,stepping=10"To test a different architecture, change model and stepping to match any entry from the Supported Processors table.
Virtual Disk Layout
C:\vm\qemu\ acts as the root of the virtual FAT volume (FS0: in EFI Shell):
C:\vm\qemu\                  ← FS0:\ in EFI Shell
├── UnderVolter.efi          ← main application (auto-copied from bin\)
├── Loader.efi               ← optional loader
├── UnderVolter.ini          ← configuration (auto-copied from bin\)
├── startup.nsh              ← auto-run script (created by run-qemu.ps1)
├── ovmf-vars.fd             ← UEFI NVRAM variables (persistent across runs)
└── qemu-error.log           ← QEMU stderr output
startup.nsh (Auto-Run Script)
@echo -off
fs0:\undervolter.efi
echo .
echo === Done. Press Enter to close QEMU ===
pause
Source Code Structure
UnderVolter/
├── src/
│   ├── UnderVolter.c        # Main entry point (UefiMain)
│   ├── UnderVolter.ini      # Configuration template
│   ├── Config.c             # INI parser, policy application, GetIniDataPtr()
│   ├── NvramSetup.c         # UEFI NVRAM Setup variable patcher ([SetupVar])
│   ├── SecureBootEnroll.c   # Secure Boot SelfEnroll + .auth file enrollment ([SecureBoot])
│   ├── UnderVolterCert.h    # AUTO-GENERATED by embed-cert.ps1 — root CA bytes
│   ├── Platform.c           # Package discovery, MP dispatch
│   ├── CpuInfo.c            # CPUID detection, architecture identification
│   ├── CpuData.c            # CPU database (supported models)
│   ├── CpuDataVR.c          # VR topology data per architecture
│   ├── CpuMailboxes.c       # OC Mailbox interface
│   ├── VoltTables.c         # Voltage encoding tables
│   ├── PowerLimits.c        # PL1/PL2/PL3/PL4 programming
│   ├── TurboRatioLimits.c   # Turbo ratio configuration
│   ├── VfCurve.c            # V/F curve programming
│   ├── SafetyPrompts.c      # Warning dialogs, emergency exit
│   ├── ConsoleUi.c          # Text console UI
│   ├── UiConsole.c          # Low-level console output
│   ├── PrintStats.c         # Settings display after programming
│   ├── InterruptHook.c      # Safe ASM interrupt handler
│   ├── MpDispatcher.c       # Multi-core dispatch
│   ├── HwAccess.c           # MSR/MMIO access helpers
│   ├── DelayX86.c           # Timing routines
│   ├── FixedPoint.c         # Fixed-point math utilities
│   ├── SelfTest.c           # Power management self-test
│   ├── OcMailbox.c          # OverClock Mailbox interface
│   ├── TimeWindows.c        # Timing for Windows (if needed)
│   └── ASMx64/              # x64 assembly routines
├── signer/
│   ├── sign.ps1             # EFI Authenticode signing (called by build.ps1)
│   ├── embed-cert.ps1       # Converts .cer to C header (UnderVolterCert.h)
│   └── cert/
│       ├── undervolter-standard-root.cer      # Root CA public cert (DER)
│       ├── undervolter-standard-signing.cer   # Signing cert public (DER)
│       ├── undervolter-standard-signing.pfx   # PRIVATE KEY — never put on ESP
│       ├── undervolter-standard-signing.pwd   # PFX password — never put on ESP
│       └── signing.config.json                # Name config
├── bin/                     # Build output
├── build.ps1                # Build script (embed-cert → compile → sign → clean)
├── run-qemu.ps1             # QEMU test script
└── UnderVolter.sln          # Visual Studio solution
Key Modules
| Module | Responsibility |
|---|---|
UnderVolter.c |
Entry point, initialization sequence, main flow |
Config.c |
INI parsing, profile matching, policy application, GetIniDataPtr() |
NvramSetup.c |
UEFI NVRAM Setup variable read/patch/verify/reboot ([SetupVar]) |
SecureBootEnroll.c |
Secure Boot SelfEnroll (root CA → db/KEK/PK), DeployedMode transition, .auth file enrollment ([SecureBoot]) |
Platform.c |
MP services, package/core discovery, VR topology |
CpuInfo.c |
CPUID leaf parsing, architecture detection |
VoltTables.c |
Voltage offset encoding (256-entry lookup table) |
PowerLimits.c |
MSR/MMIO power limit programming |
SafetyPrompts.c |
Unknown CPU warning, emergency exit (ESC key) |
ConsoleUi.c |
High-level UI: startup animation (bolts, arc, oscilloscope), progress bar |
UiConsole.c |
Low-level GOP/console: text rendering, framebuffer fill, cursor, glyph fallbacks |
PrintStats.c |
Voltage domain table display after programming |
InterruptHook.c |
Safe exception handler (prevents triple faults) |
Troubleshooting
System Hangs After Programming
Symptom: System freezes or reboots after UnderVolter applies settings.
Solution:
- Reboot and press ESC within 2 seconds to skip voltage programming
- Reduce voltage offset in
UnderVolter.ini(e.g., from -100 mV to -80 mV) - Test stability with stress testing tools (Prime95, AIDA64, Cinebench)
- Gradually increase offset until stable maximum is found
"Unknown CPU" Warning
Symptom: UnderVolter shows warning about unknown CPU model/family/stepping.
Solution:
- Press F10 to override and continue (if you're confident CPU is compatible)
- Edit
CpuData.cto add your CPU's CPUID signature - Add corresponding profile in
UnderVolter.ini - Rebuild from source
INI File Not Found
Symptom: UnderVolter uses safe defaults instead of custom settings.
Solution:
- Ensure
UnderVolter.iniis in same directory asUnderVolter.efi - Check fallback paths:
\EFI\OC\Drivers\,\EFI\Boot\, etc. - Verify file encoding: UTF-8 without BOM
- Check for syntax errors in INI file (missing brackets, invalid keys)
QEMU Testing Fails
Symptom: QEMU exits immediately or shows errors.
Solution:
- Verify OVMF firmware paths in
run-qemu.ps1 - Ensure
efi-diskdirectory containsUnderVolter.efiandUnderVolter.ini - Check QEMU error log:
C:\vm\qemu\qemu-error.log - Use correct CPUID for your target architecture (e.g.,
family=6,model=158,stepping=10for Coffee Lake)
OpenCore Boot Loop
Symptom: System enters boot loop after adding UnderVolter to OpenCore.
Solution:
- Boot from USB with OpenCore
- Hold Space during boot to access verbose mode
- Locate error message related to
Undervolter.efi - Temporarily disable driver in
config.plist(Enabled = false) - Check
UnderVolter.inifor syntax errors - Try loading as Tool instead of Driver
SelfEnroll Fails or Secure Boot Not Active After Reboot
Symptom: [SBE] SelfEnroll: not in Setup Mode. or Secure Boot still shows Disabled/Setup Mode after reboot.
Solution:
- Enter BIOS → Security / Secure Boot → clear all Secure Boot keys or disable Secure Boot entirely (depends on OEM) → save → reboot
- Verify in BIOS that Platform Key (PK) is listed as
[Not Installed]or similar — this confirms Setup Mode is active - Run
UnderVolter.efiagain from UEFI Shell and confirm[SBE] db: OK KEK: OK PK: OK - If
[SBE] SelfEnroll: no certificate embedded.appears: the EFI was compiled without cert; runbuild.ps1after generating the cert with OpenSSL (see Secure Boot & SelfEnroll)
Symptom: Secure Boot is Enabled but firmware shows Audit Mode instead of User Mode after SelfEnroll reboot.
Solution:
- If
TryDeployedMode = 1and[SBE] DeployedMode: firmware rejectedwas printed — the firmware requires a manual BIOS UI action - Enter BIOS → Secure Boot → switch Mode from Custom/Audit to User (AMI: Secure Boot Mode → Standard; Dell/InsydeH2O: re-enable Secure Boot) → save → reboot
- Verify: Secure Boot: Enabled, Mode: User Mode
Voltage Not Applied
Symptom: UnderVolter runs and exits normally but CPU voltage is unchanged.
Possible causes and solutions:
1. INI file not found — look for this line in console output:
WARNING: UnderVolter.ini not found! Using safe fallback defaults.If present: all programming is disabled by default. Place UnderVolter.ini in the same directory as UnderVolter.efi. See INI File Search Order for all searched paths.
2. No matching profile for detected CPU — look for:
WARNING: No profile found for CoffeeLake. Searching for default.If present: UnderVolter fell back to [Profile.Generic]. Add a [Profile.X] section matching your CPU's architecture name to UnderVolter.ini.
3. ESC was pressed during the 2-second countdown — voltage programming was deliberately skipped. Reboot and let the countdown finish.
4. BIOS locks active (most common on laptops) — MSR 0x150 writes are silently rejected by firmware:
- Check for
Overclocking LockandCFG Lockin BIOS settings - If hidden, use the built-in
[SetupVar]patcher — UnderVolter handles CFG Lock / OC Lock natively, no external tools needed at boot time - Applies to Skylake and newer; Sandy Bridge through Broadwell use a different voltage interface
5. OEM BIOS override — some firmware ignores MSR 0x150 entirely. Try updating BIOS to a newer version or check if an unlocked/modded BIOS is available for your model.
Download Links
| File | Size | Description |
|---|---|---|
| UnderVolter.7z | 7.2 MB | Signed UnderVolter.efi, INI template, Loader.efi and firmware analysis tools |
| UnderVolter_source_code.zip | 312 KB | Complete source code, build scripts and signing certificates |
| test-qemu.zip | 2.1 MB | QEMU/OVMF bundle: instrumented regression build, firmware image and runner script |
Video Demonstration
Watch UnderVolter in action:
Video shows:
- QEMU/OVMF boot sequence
- CPU detection and profile loading
- Emergency exit demonstration (ESC key)
- Voltage programming progress
- Final settings display
License
Apache License 2.0
Full text available in project repository (LICENSE file).
Disclaimer
WARNING: This code is a proof of concept for educational purposes. It can modify internal computer configuration parameters and cause malfunctions or even permanent damage. It has been tested on a limited range of target CPUs and has minimal built-in failsafe mechanisms, thus making it unsuitable for recommended use by users not skilled in the art. Use it at your own risk.
All trademarks, logos, and brand names are the property of their respective owners. Intel, Core, and related marks are trademarks of Intel Corporation.
Contributing
Adding Support for New CPUs
-
Identify CPUID Signature
- Use CPU-Z, HWiNFO, or run
cpuidcommand in EFI Shell - Note: Family, Model, Stepping
- Use CPU-Z, HWiNFO, or run
-
Edit
CpuData.c{ .Family = 0x06, .Model = 0x97, .Stepping = 0x02, .uArch = "RaptorLake", .vtdt = &RaptorLakeVRData, } -
Add Profile to
UnderVolter.ini[Profile.RaptorLake] Architecture = "RaptorLake" OffsetVolts_IACORE = -80 OffsetVolts_RING = -60 ; ... rest of settings -
Test and Report
- Test on your hardware
- Report stable values to project repository
- Include: CPU model, BIOS version, stable offsets, stress test results
Reporting Issues
When reporting bugs or instability:
- CPU Model: i7-9750H, i9-12900K, etc.
- BIOS Version: F12, 1.2.3, etc.
- UnderVolter Version: Git commit hash or release tag
- Settings: Full
UnderVolter.inicontent - Symptoms: Hang, reboot, BSOD, no change, etc.
- Stress Test Results: Prime95, AIDA64, Cinebench scores
Community Resources
- Overclock.net — Active undervolting community with per-CPU stability data
- Reddit r/overclocking — User-submitted voltage/frequency curves
- TechPowerUp — CPU database with specifications and reviews
- Intel ARK — Official Intel processor specifications
Last updated: 2026-09-08
Add a comment